No edit summary |
|||
| (14 intermediate revisions by 2 users not shown) | |||
| Line 2: | Line 2: | ||
==Introduction== | ==Introduction== | ||
* General invoice to customer | * General invoice to customer like services, insurance, or any non-stock control billing. | ||
* | *Do note that you CANNOT select any item codes in Customer Invoice. | ||
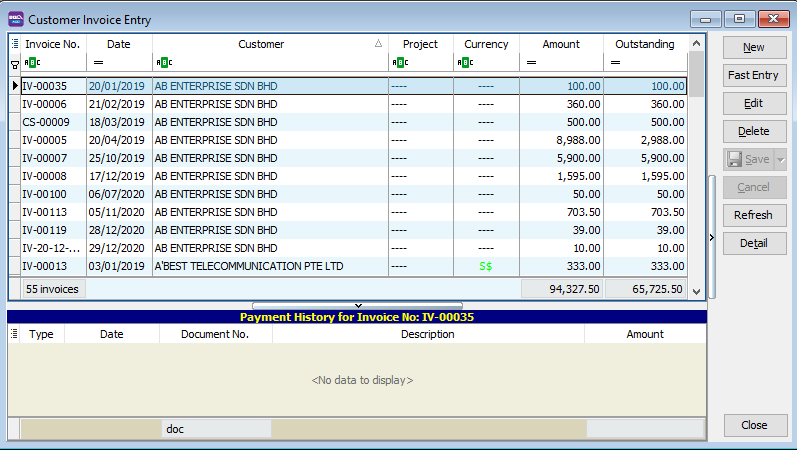
*use customer invoice to check the status of outstanding and payment history. | |||
[[File:Cust invoice.png|center]] | |||
==Customer Invoice - Entry== | |||
:1. Click on '''New''' button. | |||
:2. See the New Customer Invoice entry form screenshot below. | |||
[[File:Cust invoice2.png|center]] | |||
==Customer Invoice Entry== | :3. Select the Customer Code. You direct key-in and search by either '''customer code''' or '''name'''. | ||
1. Click on New button. | * press the TAB button on your keyboard to shift the search method. The highlighted column indicates the search by column | ||
2. See the New Customer Invoice entry form screenshot below. | [[File:cust invoice-tab.png|800px|center]] | ||
:4. Input the '''Sales A/c''' and amount to be credit. | |||
:5. Below is the example of the entry created: | |||
3. Select the Customer Code. You direct key-in and search by either customer code or name. | |||
4. Input the Sales A/c and amount to be | |||
5. Below is the example of the entry created: | |||
Double Entry will be:- | Double Entry will be:- | ||
DR CR | DR CR | ||
AB ENTERPRISE SDN BHD RM500.00 | |||
Sales Account RM500.00 | |||
==Customer Invoice - Project== | ==Customer Invoice-More: Project== | ||
* There are 2 types of project you need to be take note. | * There are 2 types of project you need to be take note. | ||
# Document Project | # Document Project | ||
# Detail Project | # Detail Project | ||
* For document project, you need to point to MORE section (on the left side bar). | * For '''document project''', you need to point to '''MORE''' section '''(on the left side bar)'''. | ||
* For detail project, you have to insert the | * For '''detail project''', you have to insert the '''project''' column out from Field Chooser. | ||
[[File:cust invoice project.png|800px|center]] | |||
==Customer Invoice - Attachment== | ==Customer Invoice - Attachment== | ||
You can use this feature to attach external PDF, excel, word documents and image files. | |||
[[File:cust invoice attachment.png|800px|center]] | |||
::[[File: | :1. Go to the left of the screen and click "Attachment" | ||
:2. Click the small black arrow at the red plus icon | |||
:3. select File , and choose the file form your computer that you want to attach | |||
==Customer Invoice - Note== | |||
:1. Click on the Note section '''(on the LEFT side bar)'''. | |||
:2. '''RIGHT''' click it, you will see the '''Rich Text Editor''' pop-up. | |||
:3. You can start key-in the note. See the example screenshot below. | |||
:4. Click on '''X''' button to save and exit the '''Rich Text Editor'''. | |||
[[File:cust note1.png|800px|center]] | |||
[[File:cust note2.png|800px|center]] | |||
:5. You will get prompted the '''Save changes?''' message. Click '''YES''' to save it. | |||
[[File:Cust note3.png|800px|center]] | |||
1. | ==Customer Invoice - Invoice Description== | ||
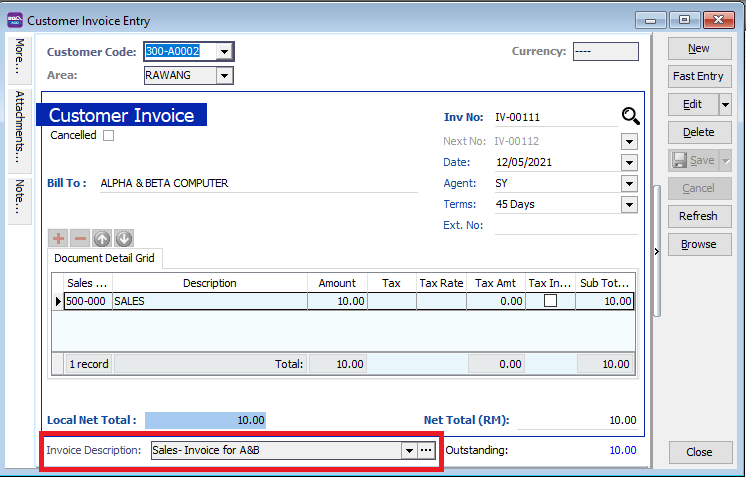
:1. To show the document description in Customer Statement, eg. '''Sales Invoice for A&B'''. | |||
[[File:Customer Invoice-Description.png|800px|center]] | |||
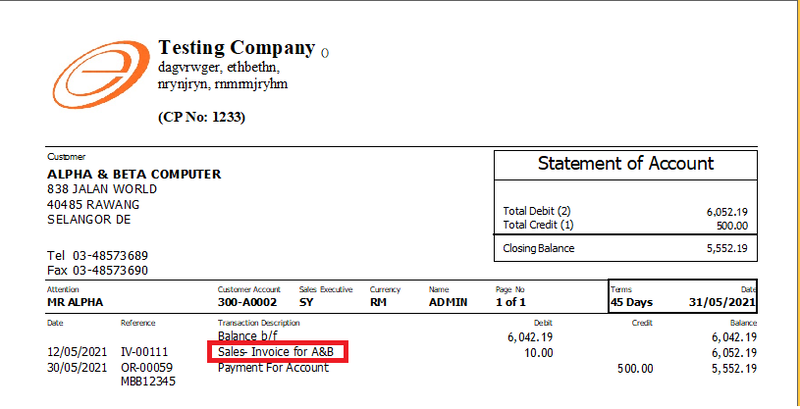
:2. Sample of customer statement screenshot below. | |||
[[File:Customer Invoice-Description2.png||800px|center]] | |||
==Customer Invoice - | ==Customer Invoice - Report== | ||
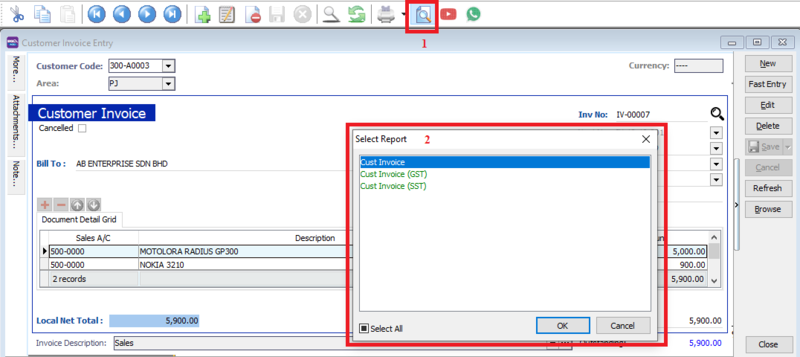
*After saving your customer invoice, you can preview your report. Press the preview icon to preview your invoice report | |||
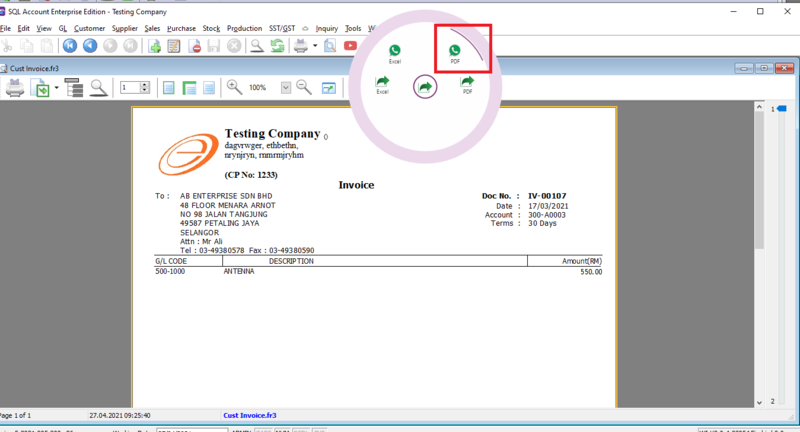
* You can print, export your report, or send it to your customer via whatsapp. | |||
[[File:cust invoice preview report.png|800px|center]] | |||
== | == How to send report via Whatsapp== | ||
[[File:report send 1.png|center]] | |||
[[File:report send2.png|800px|center]] | |||
A QR code will appear on the screen. Scan the QR code with your Whatsapp's WhatsappWeb function | |||
* | ==See also== | ||
* [https://wiki.sql.com.my/wiki/account4:Contents SQL Accounting] | |||
* [[Print Customer Statement]] | |||
Latest revision as of 05:57, 26 May 2021
Menu: Customer | Customer Invoice...
Introduction
- General invoice to customer like services, insurance, or any non-stock control billing.
- Do note that you CANNOT select any item codes in Customer Invoice.
- use customer invoice to check the status of outstanding and payment history.
Customer Invoice - Entry
- 1. Click on New button.
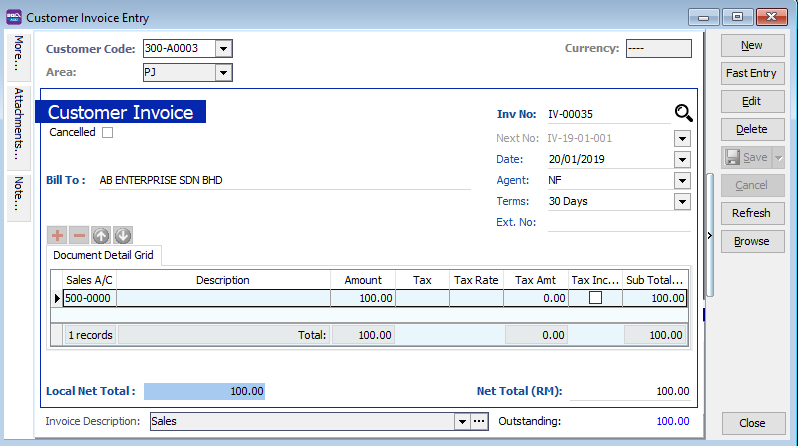
- 2. See the New Customer Invoice entry form screenshot below.
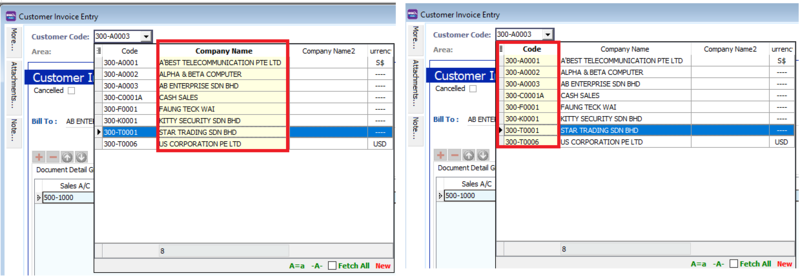
- 3. Select the Customer Code. You direct key-in and search by either customer code or name.
- press the TAB button on your keyboard to shift the search method. The highlighted column indicates the search by column
- 4. Input the Sales A/c and amount to be credit.
- 5. Below is the example of the entry created:
Double Entry will be:-
                                  DR         CR
 AB ENTERPRISE SDN BHD   RM500.00
 Sales Account                          RM500.00
Customer Invoice-More: Project
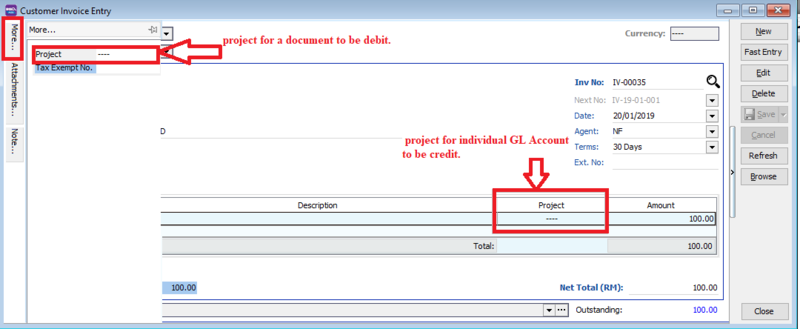
- There are 2 types of project you need to be take note.
- Document Project
- Detail Project
- For document project, you need to point to MORE section (on the left side bar).
- For detail project, you have to insert the project column out from Field Chooser.
Customer Invoice - Attachment
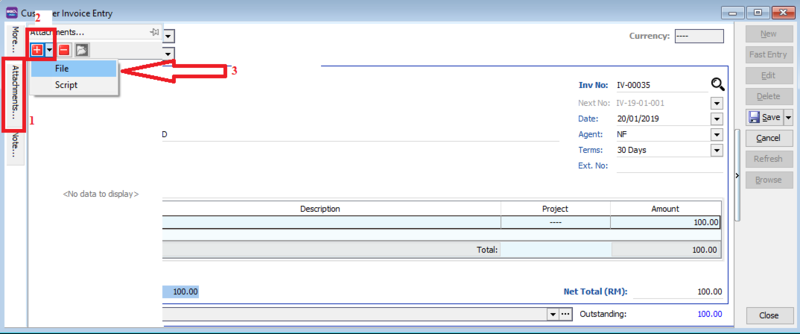
You can use this feature to attach external PDF, excel, word documents and image files.
- 1. Go to the left of the screen and click "Attachment"
- 2. Click the small black arrow at the red plus icon
- 3. select File , and choose the file form your computer that you want to attach
Customer Invoice - Note
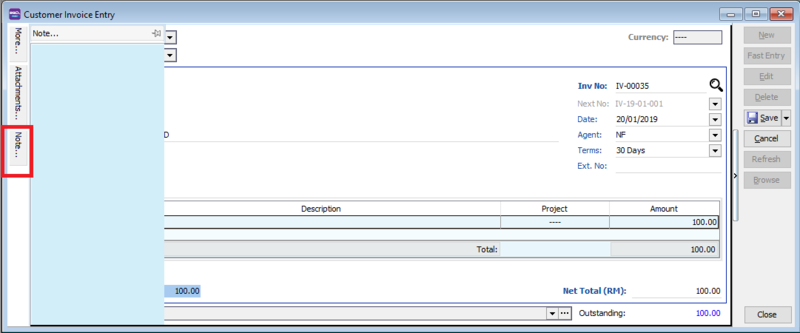
- 1. Click on the Note section (on the LEFT side bar).
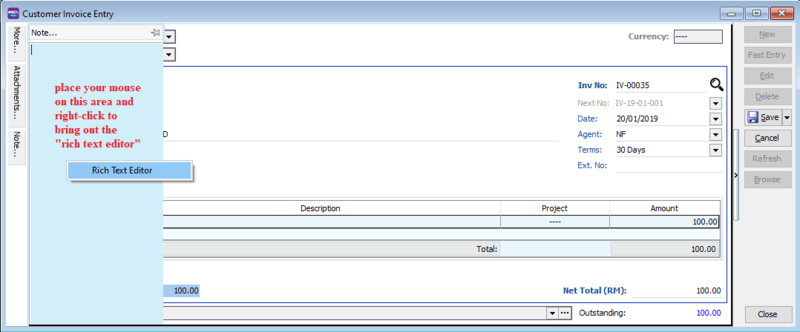
- 2. RIGHT click it, you will see the Rich Text Editor pop-up.
- 3. You can start key-in the note. See the example screenshot below.
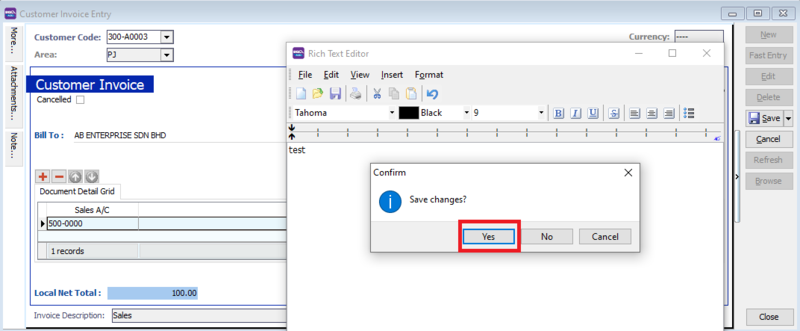
- 4. Click on X button to save and exit the Rich Text Editor.
- 5. You will get prompted the Save changes? message. Click YES to save it.
Customer Invoice - Invoice Description
- 1. To show the document description in Customer Statement, eg. Sales Invoice for A&B.
- 2. Sample of customer statement screenshot below.
Customer Invoice - Report
- After saving your customer invoice, you can preview your report. Press the preview icon to preview your invoice report
- You can print, export your report, or send it to your customer via whatsapp.
How to send report via Whatsapp
A QR code will appear on the screen. Scan the QR code with your Whatsapp's WhatsappWeb function
