Introduction
Is External Shareware Program which Convert Sales to Purchase Module or vice versa which exported from SQL Accounting
Normally is use to Export Data From SQL Accounting Database A from Document Type A (Eg Sales Invoice) & Import to SQL Accounting Database B as other Document Type (Eg Purchase Invoice)
Limitation
- Only support 1 Company Code (i.e. 1 batch 1 Company Code)
- Both Source & Target must had Same Itemcode
Import Program
- Version (5.2.1.8) - 17 Feb 2023
- https://download.sql.com.my/customer/Fairy/SQLAccSLPHV5-setup.exe
- MD5 : 54B8EE0427C28BE48E8BC6F0FE87334F
History New/Updates/Changes
--Build 8--
- Fixed Get File Error due to SEQ field.
- Add Get User Guide... Option.
--Build 7--
- Upgrade to Version 5.2.1.
- Enable Quick Customise Layout for Grid.
- Empty Item Code should by pass from Verify.
- Allow User Override Header Description.
- Enable Support Unicode
--Build 6--
- Fixed Import Sales/Purchase CN & DN Error.
--Build 5--
- Upgrade to Version 5.2.
- Add Option Use My Maintain Supplier/Customer Information for Sales/Purchase Import.
- Enable support Running In Windows Limited User.
--Build 4--
- Fixed Shown TaxCode Even Original no TaxCode.
--Build 3--
- Fix TaxRate Not Import
- Fixed Import Customer/Supplier prompt bad variance type.
--Build 2--
- Enable Support Version 5 SQL Accounting
- Add Maintain Tax
--Build 1--
- Fix unable to register Database
Todo
Settings
In SQL Accounting
- 01. May refer to Point 2 at Things To Consider Before Import/Post
- 02. Make sure this option is Tick under Tools | Options | Customer
- Perform Tax/Local Amount Rounding
In SLPH Import
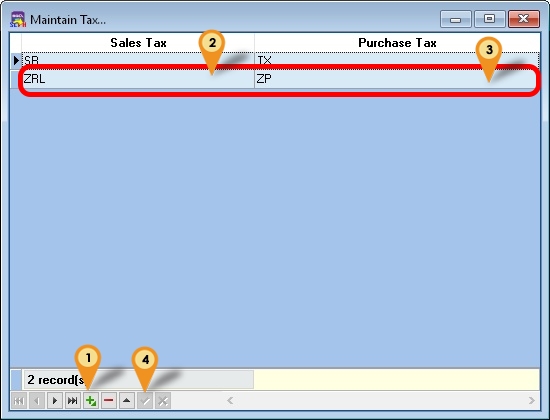
Menu : Tools | Maintain Tax
- 01. Click New/Edit to Insert or update
- 02. Select Sales Tax Code
- 03. Select Purchase Tax Code
- 04. Click Post/Save
Steps
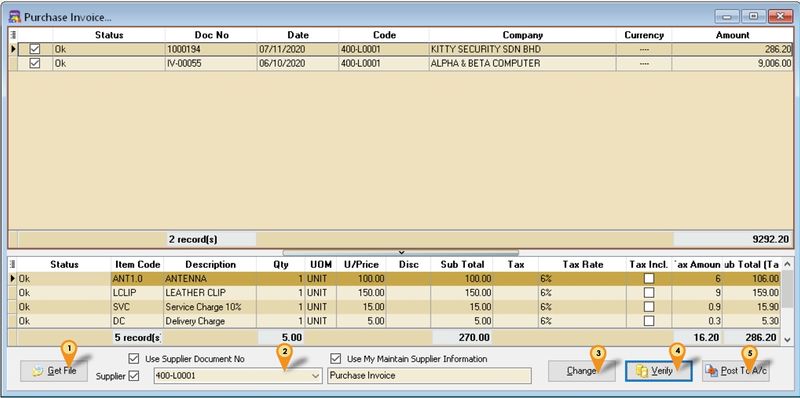
Menu : Purchase | Purchase Invoice...
Below steps is example to import Purchase Invoice
- 01. Click Get File button
- 02. Select Supplier Code to update
- 03. Click Change Button
- 04. Click Verify button
- 05. Click Post to A/c Button
| Option | Description |
|---|---|
| Use Supplier Document No |
|
| Use My Maintain Supplier Information |
|
| Purchase Invoice(Below Use My Maintain Supplier Information Option) |
|
See also
- FAQ
- Others Customisation

