Introduction
Is External Utility to Fixing & Managing SQL Firebird Database.
Program
- Version (2.5.0.22) - 03 Jan 2017
- http://www.estream.com.my/downloadfile/Fairy/SQLDiagnosisV2.zip
- MD5 : 4AB620F3A88DF2A66E397D271AF82B25
History New/Updates/Changes
--Build 22--
- Internal release.
--Build 21--
- Upgrade to Version 2.5.
- Fix unable open fdb in LocalHost.
- Add Batch Backup.
- Add Schedule Backup.
- Fix AR/AP Copy Paste Patch not working in some situation.
- Fix still unable to backup in some situation.
- Fix Backup Metadata setting not correct for FB3.0 unicode
- Add Firebird Version label for Patch, Validate & Adhoc Backup.
--Build 20--
- Fix Application Name Error.
- Add DB Online function.
- Add Remove InValid CN Patch.
--Build 19--
- Fix unable to backup.
- Add Load From File... for DB Patch...
--Build 18--
- Upgrade to Version 2.4.
- Enable Support Firebird 3.0.
- Enhance Validate to support IBPump.
- Find Tune SQL Patch for New Patch Generator.
- Add Remove Maintain Customer, Supplier, Stock Item & Other Stock Maintenance.
- Add AR/AP Copy Paste Error Patch.
- Add Change Cash To Bank Type Patch.
- Add Reset Grid Layout Patch.
- Add Delete Default Currency Patch.
Requirement
- Firebird Server (even is Standalone user)
Todo
Database Patch
- A min console use to manipulate the data including edit, delete and append data.
- There are 2 type of patch
- Patch From Estream
- Build In Patch
Steps
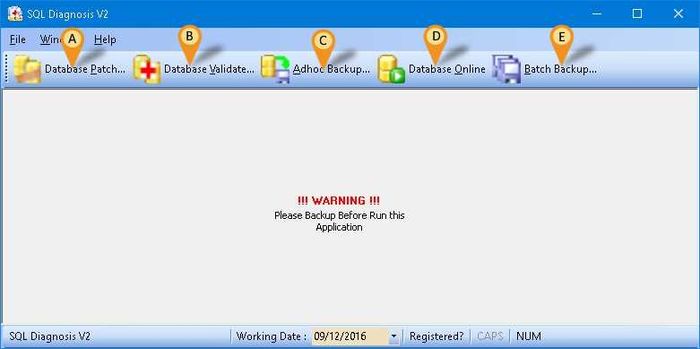
- 01. Click Database Patch button (Icon A).
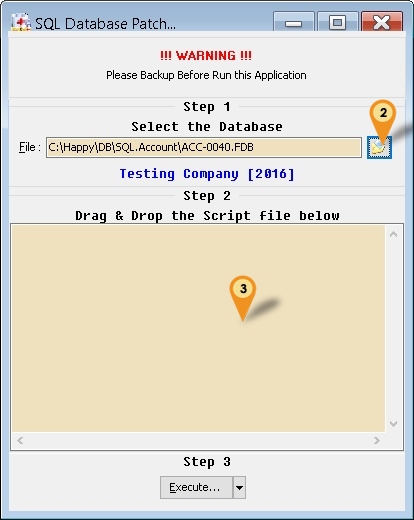
- 02. Click This button to select the SQL Firebird Database.
Patch From Estream
- 03. Right Click Here
- 04. Select Load From File...
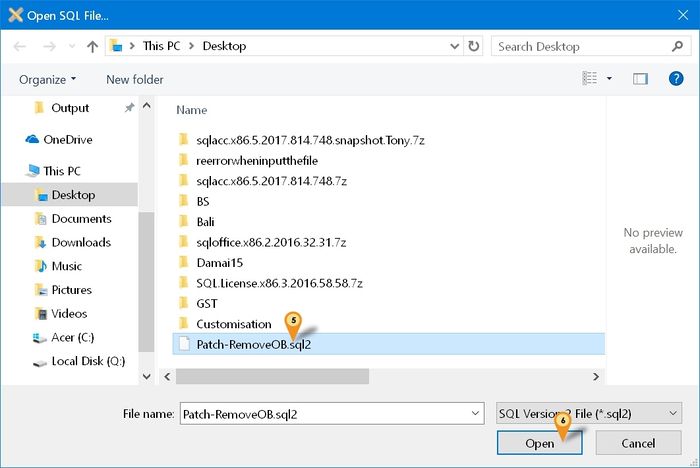
- 05. Look for patch file (Norm begin with Patch-XXXX.sql)
- 06. Click Open button.
- 07. Click Execute... button (In Step 3 Section).
Build In Patch
- 03. Click the Arrow down button near the Execute... button.
- 04. Select the Patch from the available list.
- 05. Click Execute... button (In Steps 3 Section).
| Patch Type | Description |
|---|---|
| AR/AP Copy Paste Error... | It will
|
| Change Cash To Bank Type | Change Account Type from Cash To Bank Type
|
| Rest Grid Layout | Reset all Layout to Default. |
| Remove > InValid Payment Method... | Delete Invalid Record in Maintain Payment Method |
| Remove > Non-Stock Control Opening Balance... | Delete all Non-Stock Control Opening Balance |
| Remove > All Customer... | Delete All Maintain Customer Records |
| Remove > All Supplier... | Delete All Maintain Supplier Records |
| Remove > All Stock Item... | Delete All Maintain Item Records |
| Remove > All Other Stock Maintenance... | Delete All Other Stock Maintenance
|
| Remove > Default Currency Code | Delete Default Currency |
| Remove > InValid Credit Note | Remove the redundancy AR/AP Credit Note Detail Records in GL Ledger |
Database Validate
- A function use to fix database corrupt
Steps
- 01. Stop the Firebird Service.
- 02. Copy the database & Paste to Desktop or any folder you wanted.
- 03. Start the Firebird Service.
- 04. Click Database Validate button (Icon B).
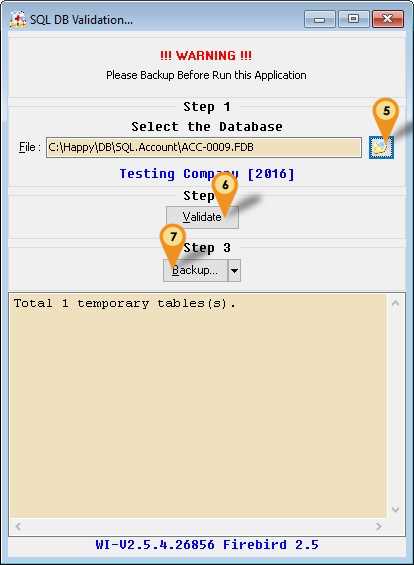
- 05. Click This button to select the Copied SQL Firebird Database.
- 06. Click Validate button.
|
- 07. Click Backup... button.
| Function | Description |
|---|---|
| Backup Metadata... | To Extract Empty Database Structure for IB Pump to copy to New Database. |
| IB Pump... | Open the Database Pump which use to Copy data to New Database. |
| Direct Zip... | Use this to Zip & upload to Estream if still unable to fix the problem. |
Backup MetaData
- Use this option when normal backup is fail.
Steps
- 01. Click the arrow down button at Backup... button.
- 02. Select Backup MetaData....
- 03. Click the 3 dot button to select the Source of database.
- 04. Change Dialect to 3.
- 05. Click the 3 dot button to select the Target of database (norm is TARGET.FDB same folder path with source database).
- 06. Click Step2: Order tab.
- 07. Click Get Definitions button.
- 08. Click Build Relations button.
- 09. Click Step3: Pump tab.
- 10. Click Start button.
- 11. Click Yes button.
- 12. Make sure you see the All Fine! message & Click OK
- 13. Click Close Button.
- 14. Click Backup... Button.
Adhoc Backup
- A function use to backup the database
Steps
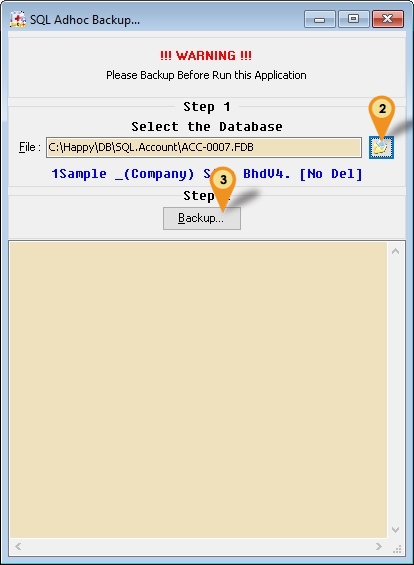
- 01. Click Adhoc Backup button (Icon C).
- 02. Click This button to select the SQL Firebird Database.
- 03. Click Backup button.
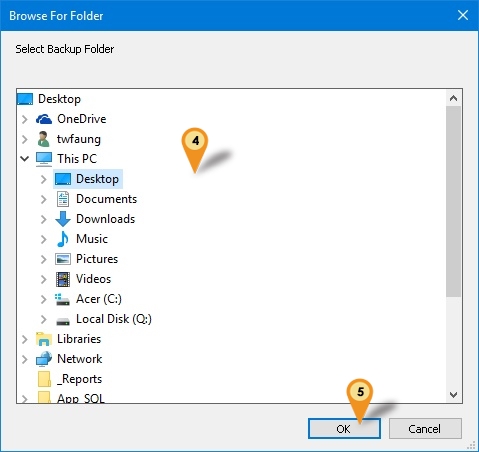
- 04. Select the Backup Folder (Default will Save to Desktop).
- 05. Click OK to Start Backup.
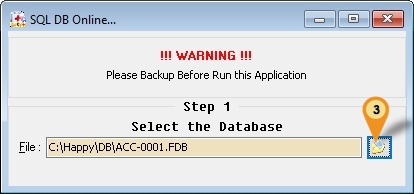
Database Online
- A function to bring back the database online when facing error "Database Shutdown"
Steps
- 01. Restart the Firebird.
- 02. Click Database Online button (Icon D).
- 03. Click This button to select the SQL Firebird Database.
Batch Backup
- A function to 1 button to backup for all database or for Schedule backup.
Steps
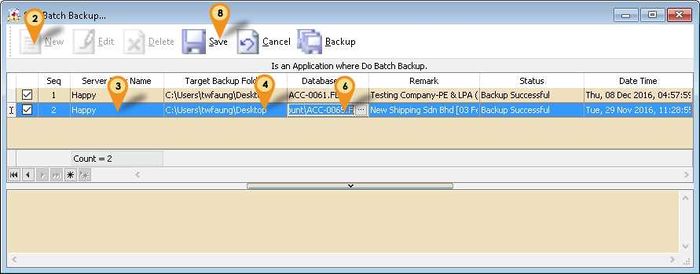
- 01. Click Batch Backup... button(Icon E)
- 02. Click New button.
- 03. Enter the Server Name/IP Address
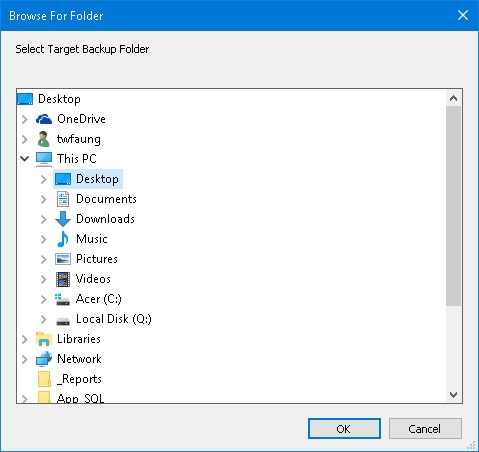
- 04. Click on 3 dot button for Target Backup Folder field
- 05. Select the folder where you wanted to backup to & click OK
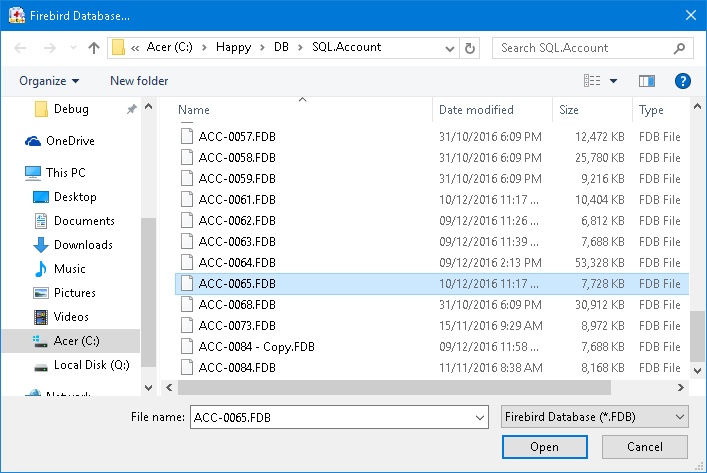
- 06. Click on 3 dot button for Database File field
- 07. Select the SQL Accounting/Payroll Database & Click Open
- 08. Click Save Button.
- 09. Repeat Step 2 to 8 for additional database
| Field | Description |
|---|---|
| Check Box |
|
| Seq | System Auto run record number sequence |
| Server IP or Name | Server Name/IP Address |
| Target Backup Folder | A folder path where the database is backup to |
| Database File | SQL Accounting/Payroll Firebird Database |
| Remark | System Auto Shown the selected Database Company Name & Remark |
| Status | Last Backup Status |
| Date Time | Last Backup Date & Time |
Schedule Backup
- Using Windows Schedule to Automatically run Batch Backup.
Steps
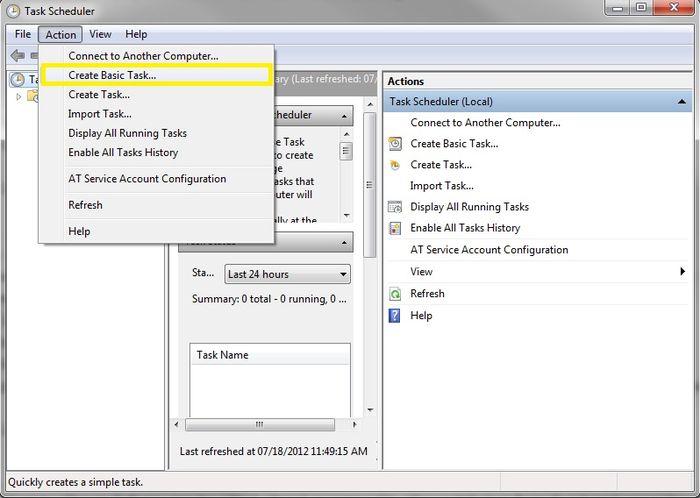
- 01. Open Windows Control Panel | Administrative Tools | Task Scheduler
- 02. Click Action | Create Basic Task...
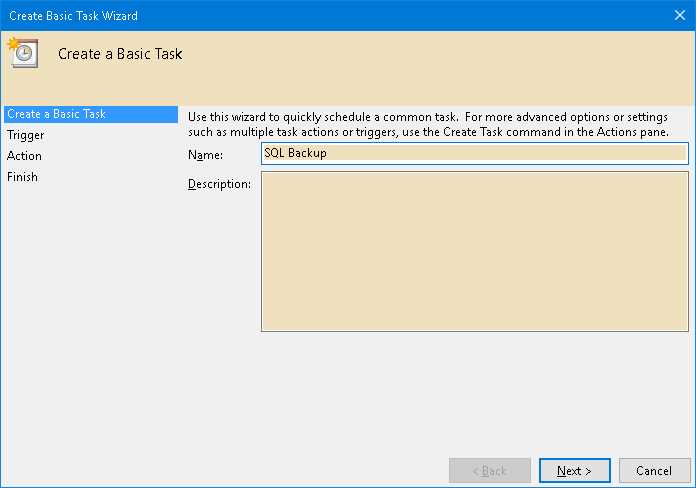
- 03. Enter Task Name (eg SQL Backup) & Click Next
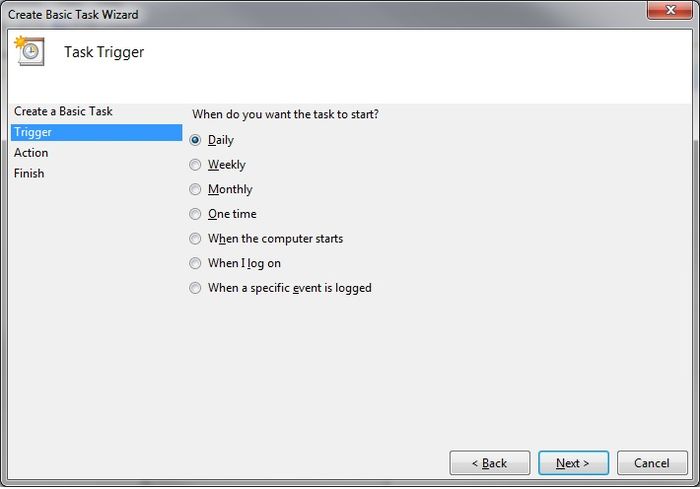
- 04. Select Daily & Click Next
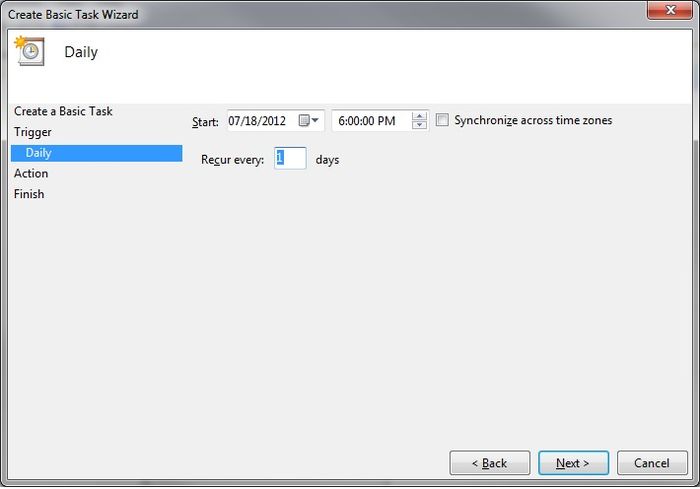
- 05. Set the Start Date & Time to Start
- 06. Set 1 for Recur every field & Click Next
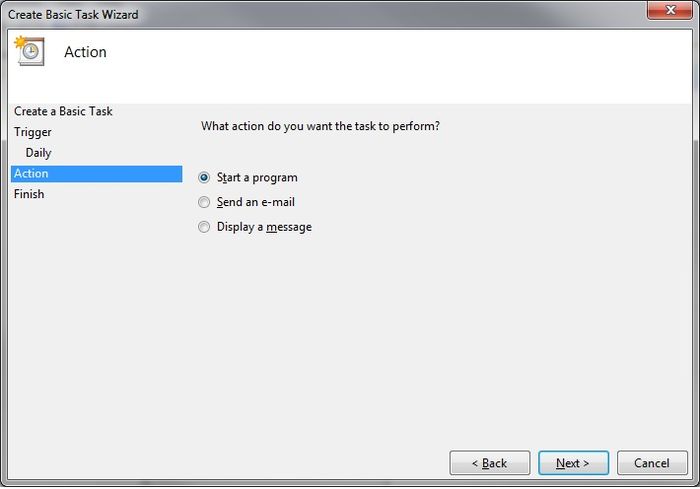
- 07. Select Start a program & Click Next
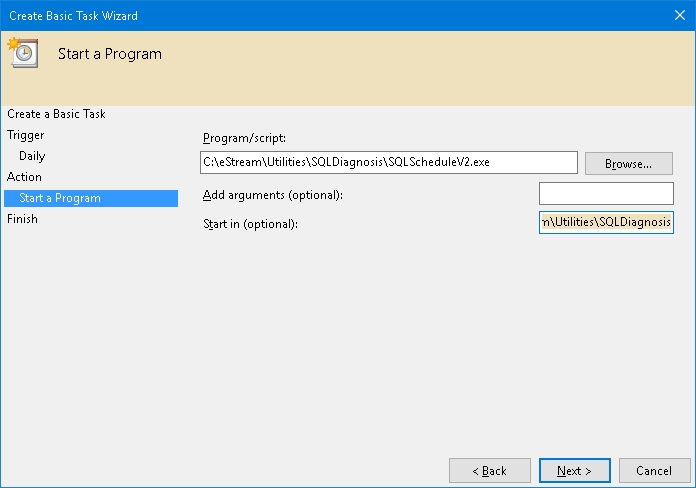
- 08. Click Browse button & find the SQLScheduleV2.exe (eg. C:\eStream\Utilities\SQLDiagnosis\SQLScheduleV2.exe)
- 09. Set the Start in(optional) path to the Exe folder (eg. C:\eStream\Utilities\SQLDiagnosis) & Click Next
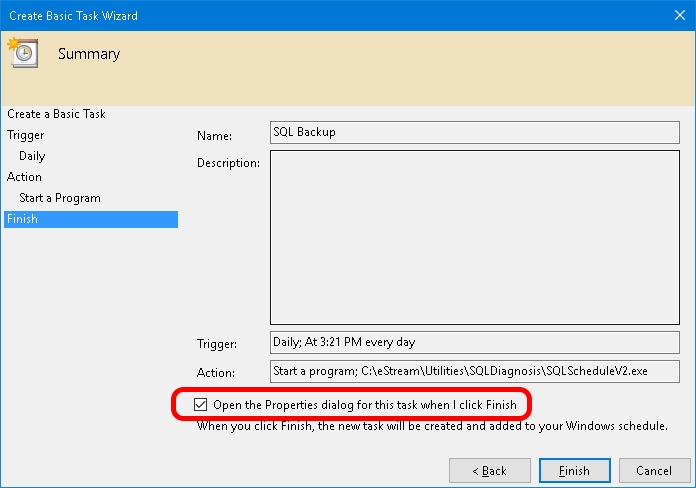
- 10. Tick the option Open the Properties dialog for this task when I click Finish
- 11. Click Finish
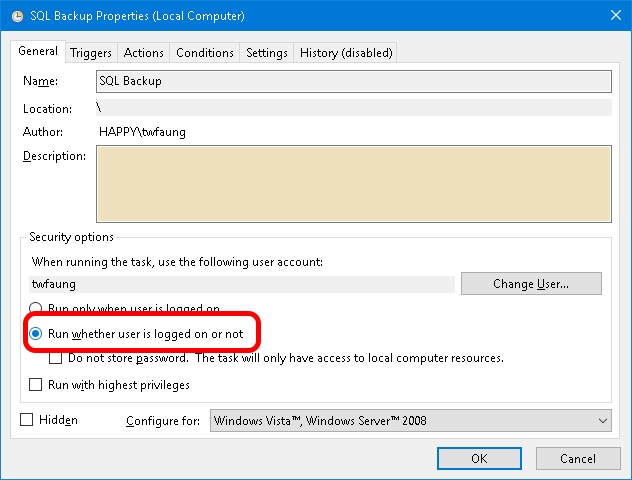
- 12. Select the option Run whether user is logged on or not
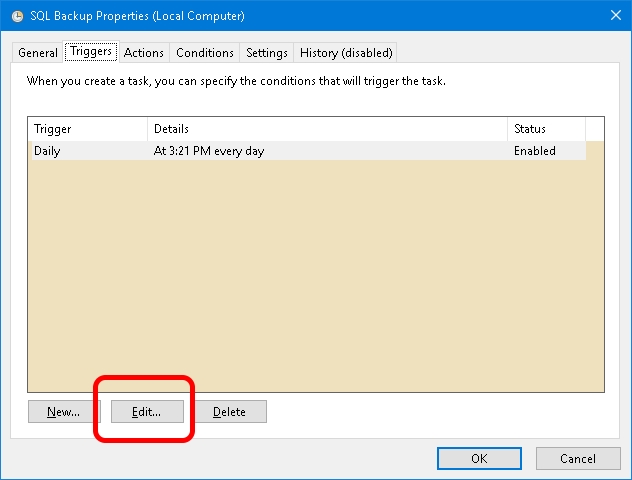
- 13. Click Triggers tab at top
- 14. Click Edit... button
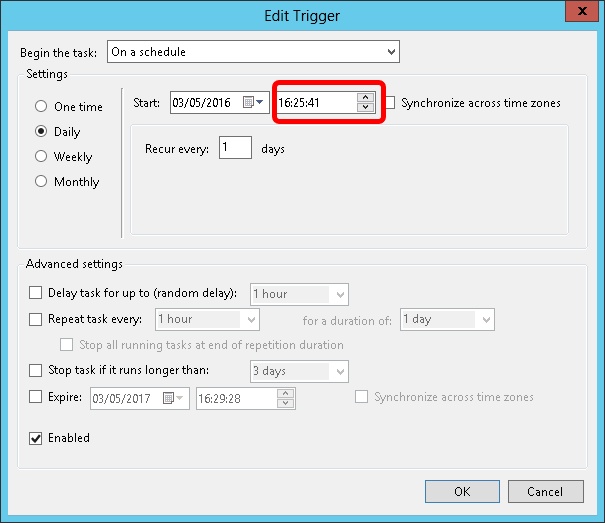
- 15. Change the time to run
- 16. Click OK 2 times
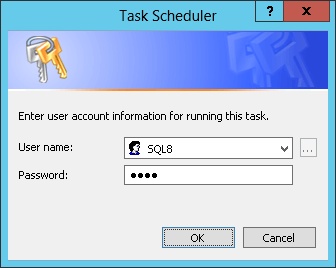
- 17. Enter the window User Name & Password
- 18. Click Ok
