| (2 intermediate revisions by the same user not shown) | |||
| Line 10: | Line 10: | ||
==Supplier Invoice - Entry== | ==Supplier Invoice - Entry== | ||
1. Click on '''New''' button. <br /> | :1. Click on '''New''' button. <br /> | ||
2. See the New Supplier Invoice entry form screenshot below.<br /> | :2. See the New Supplier Invoice entry form screenshot below.<br /> | ||
::[[File:Supplier Invoice-New.jpg|640px]] | ::[[File:Supplier Invoice-New.jpg|640px]] | ||
<br /> | <br /> | ||
3. Select the Supplier Code. You direct key-in and search by either '''supplier code''' or '''name'''.<br /> | :3. Select the Supplier Code. You direct key-in and search by either '''supplier code''' or '''name'''.<br /> | ||
4. Input the '''Purchase A/c''' and amount to be debit.<br /> | :4. Input the '''Purchase A/c''' and amount to be debit.<br /> | ||
5. Below is the example of the entry created:<br /> | :5. Below is the example of the entry created:<br /> | ||
::[[File:Supplier Invoice-Edit.jpg|640px]]<br /> | ::[[File:Supplier Invoice-Edit.jpg|640px]]<br /> | ||
| Line 50: | Line 50: | ||
<br /> | <br /> | ||
1. You have to point to the attachment section.<br /> | :1. You have to point to the attachment section.<br /> | ||
2. Click on ( + ) button to insert the filename path.<br /> | :2. Click on ( + ) button to insert the filename path.<br /> | ||
3. See the sample screenshot below.<br /> | :3. See the sample screenshot below.<br /> | ||
::[[File:Supplier Invoice-Attachment2.jpg|640px]] | ::[[File:Supplier Invoice-Attachment2.jpg|640px]] | ||
<br /> | <br /> | ||
==Supplier Invoice - Note== | ==Supplier Invoice - Note== | ||
1. Click on the Note section '''(on the LEFT side bar)'''.<br /> | :1. Click on the Note section '''(on the LEFT side bar)'''.<br /> | ||
2. '''RIGHT''' click it, you will see the '''Rich Text Editor''' pop-up.<br /> | :2. '''RIGHT''' click it, you will see the '''Rich Text Editor''' pop-up.<br /> | ||
3. You can start key-in the note. See the example screenshot below.<br /> | :3. You can start key-in the note. See the example screenshot below.<br /> | ||
4. Click on '''X''' button to save and exit the '''Rich Text Editor'''.<br /> | :4. Click on '''X''' button to save and exit the '''Rich Text Editor'''.<br /> | ||
::[[File:Supplier Invoice-Note.jpg|640px]] | ::[[File:Supplier Invoice-Note.jpg|640px]] | ||
<br /> | <br /> | ||
5. You will get prompted the '''Save changes?''' message. Click '''YES''' to save it. | :5. You will get prompted the '''Save changes?''' message. Click '''YES''' to save it. | ||
::[[File:Customer Invoice-Note2.jpg|400px]] | ::[[File:Customer Invoice-Note2.jpg|400px]] | ||
<br /> | <br /> | ||
==Supplier Invoice - Invoice Description== | ==Supplier Invoice - Invoice Description== | ||
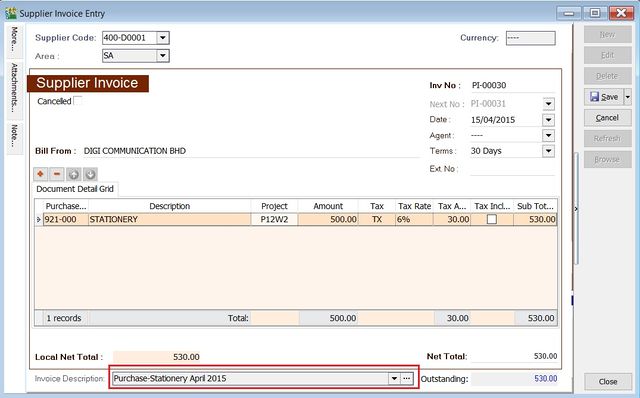
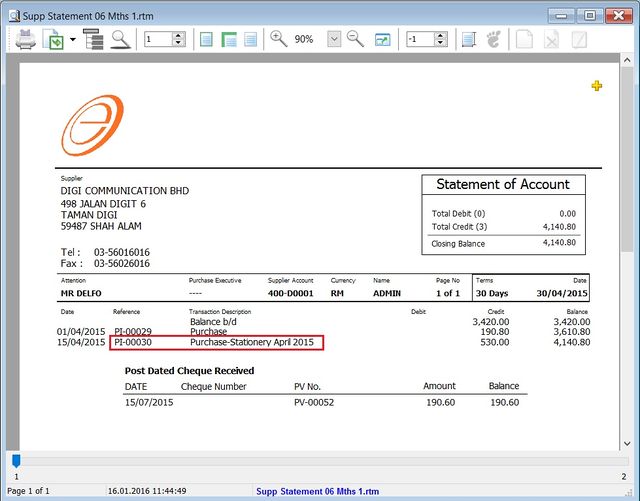
:1. To show the document description in Supplier Statement, eg. '''Purchase-Stationery April 2015'''.<br /> | |||
::[[File:Supplier Invoice-Description.jpg|640px]] | ::[[File:Supplier Invoice-Description.jpg|640px]] | ||
<br /> | <br /> | ||
:2. Sample of supplier statement screenshot below. | |||
::[[File:Supplier Invoice-Description2.jpg||640px]] | ::[[File:Supplier Invoice-Description2.jpg||640px]] | ||
<br /> | <br /> | ||
Latest revision as of 02:49, 29 February 2016
Menu: Supplier | Supplier Invoice...
Introduction
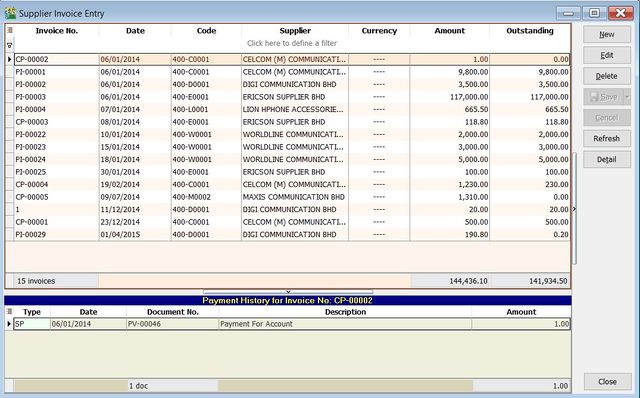
- General invoice received from supplies likes purchase of service, insurance, stationery or any non-stock control billing.
- Besides that, you can check the invoices status such as outstanding and payment history.
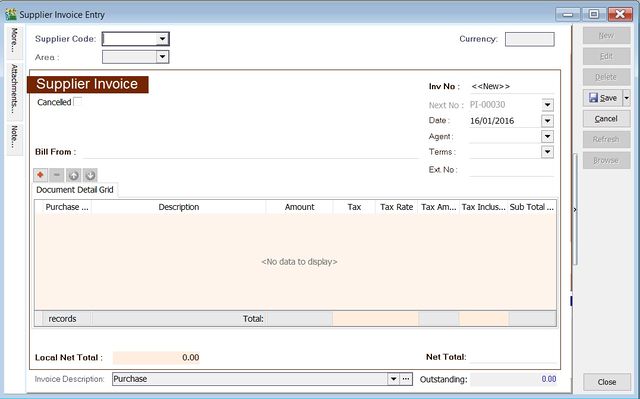
Supplier Invoice - Entry
- 3. Select the Supplier Code. You direct key-in and search by either supplier code or name.
- 4. Input the Purchase A/c and amount to be debit.
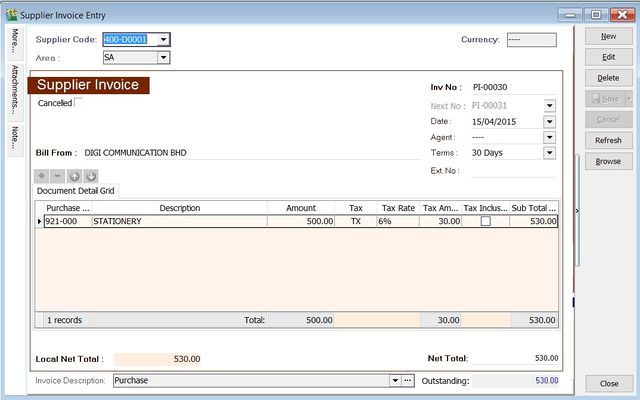
- 5. Below is the example of the entry created:
Double Entry will be:-
                                  DR         CR
 Stationery                 RM500.00
 Supplier Control Account              RM500.00
Supplier Invoice - Project
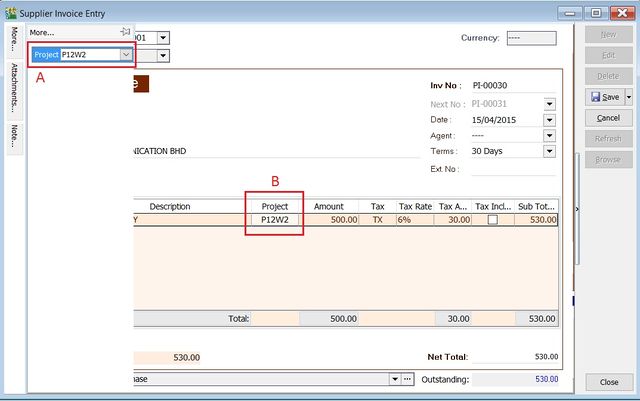
- There are 2 types of project you need to be take note.
- Document Project
- Detail Project
- For document project, you need to point to MORE section (on the left side bar).
- For detail project, you have to insert the project column out from Field Chooser.
| Label | Types | Explanation |
|---|---|---|
| A | Document Project | It represent the project for a document to be credit. |
| B | Detail Project | It represent the project for individual GL Account to be debit. |
Supplier Invoice - Attachment
- It is very useful to attach any supporting documents to an invoice.
- In future, you able to retrieve and refer the attachment file easily.
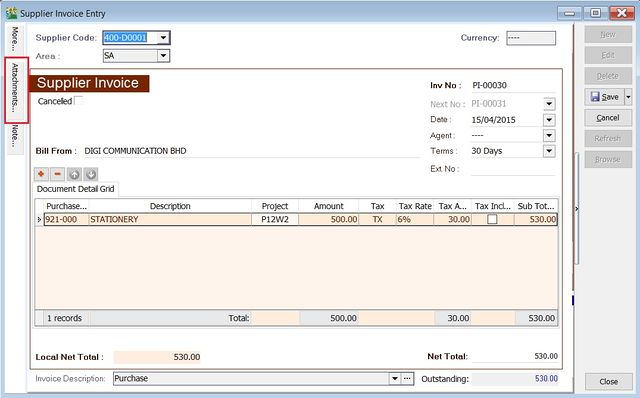
- 1. You have to point to the attachment section.
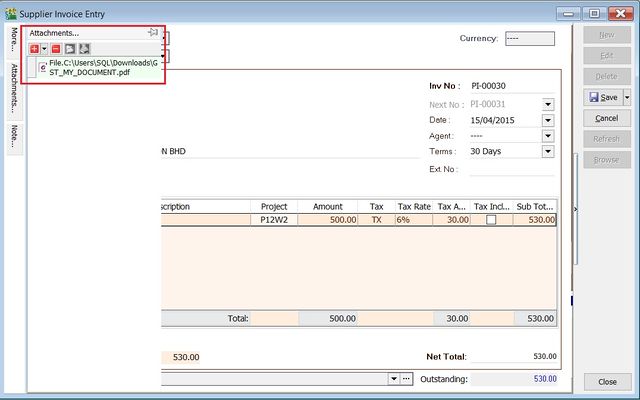
- 2. Click on ( + ) button to insert the filename path.
- 3. See the sample screenshot below.
Supplier Invoice - Note
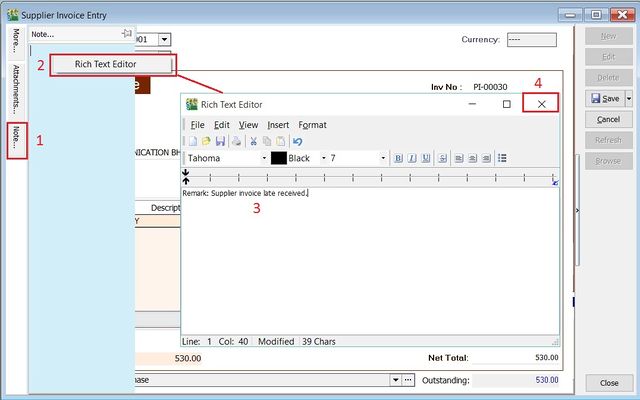
- 1. Click on the Note section (on the LEFT side bar).
- 2. RIGHT click it, you will see the Rich Text Editor pop-up.
- 3. You can start key-in the note. See the example screenshot below.
- 4. Click on X button to save and exit the Rich Text Editor.
Supplier Invoice - Invoice Description
