No edit summary |
No edit summary |
||
| (10 intermediate revisions by the same user not shown) | |||
| Line 1: | Line 1: | ||
''Menu: Production | Job Order...'' | ''Menu: Production | Job Order...'' | ||
== | ==Introduction== | ||
Sales coordinator usually will input the Sales Order (SO) based on the customer PO received. The stock products will be updated into the system as ordered qty. | Sales coordinator usually will input the Sales Order (SO) based on the customer PO received. The stock products will be updated into the system as ordered qty. | ||
| Line 17: | Line 17: | ||
::[[File:PD-Overview of Manufacturing Business Flow.jpg | 140PX]] | ::[[File:PD-Overview of Manufacturing Business Flow.jpg | 140PX]] | ||
== | ==Create New Job Order== | ||
CLICK on NEW button and SELECT the Customer. | CLICK on NEW button and SELECT the Customer. | ||
| Line 35: | Line 35: | ||
<br /> | <br /> | ||
== | ==JO Transfer From SO== | ||
1. RIGHT CLICK on Job Order (Title). | 1. RIGHT CLICK on Job Order (Title). | ||
| Line 44: | Line 44: | ||
<br /> | <br /> | ||
== | ==Document Transfer (SO --> JO)== | ||
1. Pick the item from SO list. | 1. Pick the item from SO list. | ||
| Line 51: | Line 51: | ||
3. CLICK OK button to proceed next. | 3. CLICK OK button to proceed next. | ||
::[[File: PD-Job Order-Prod Doc Transfer.jpg | | ::[[File: PD-Job Order-Prod Doc Transfer.jpg | 640px]] | ||
<br /> | <br /> | ||
4. After transferred from SO, you will see the BOM components qty updated in Job Order. | |||
::[[File: PD-Job Order.jpg | 640px]] | |||
<br /> | |||
==BEFORE SAVE - JO Check on the Available Stock Balance== | |||
1. HIGHLIGHT on the component items and PRESS on F11 keyboard button (Available Stock Balance). | |||
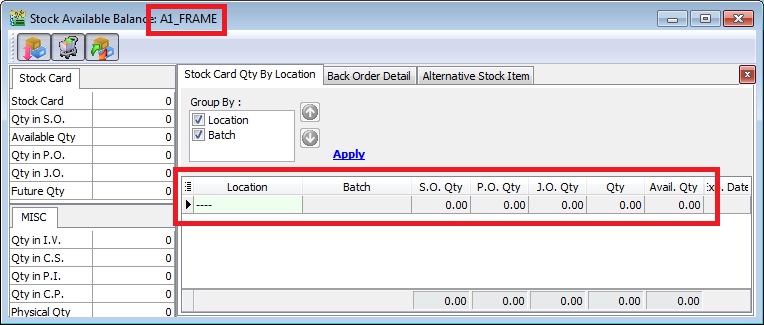
2. Below is component “FRAME” stock available balance, | |||
::[[File:PD-Job Order-AvailableBal-01.jpg | 440PX]] | |||
:: | '''Result for component “FRAME” item:''' | ||
SO Qty = 0.00 | |||
PO Qty = 0.00 | |||
JO Qty = 0.00 | |||
Qty (On Hand) = 0.00 | |||
Available Qty = 0.00 | |||
'''NOTE: Qty (On Hand) results above are trying to show the stock movement purpose only.''' | |||
<br /> | |||
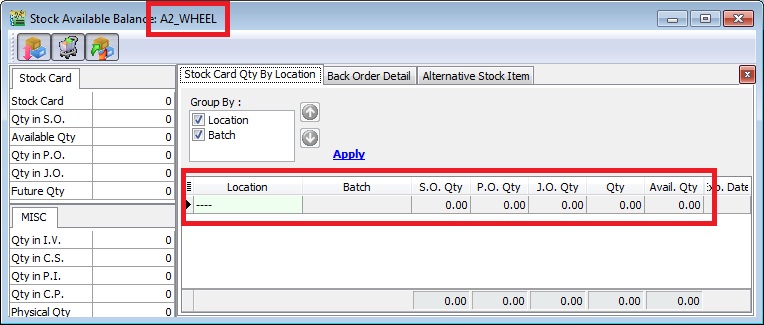
3. Below is component “WHEEL” stock available balance, | |||
::[[File:PD-Job Order-AvailableBal-02.jpg | 440PX]] | |||
'''Result for component “WHEEL” item:''' | |||
SO Qty = 0.00 | |||
PO Qty = 0.00 | |||
JO Qty = 0.00 | |||
Qty (On Hand) = 0.00 | |||
Available Qty = 0.00 | |||
: | '''NOTE: Qty (On Hand) results above are trying to show the stock movement purpose only.''' | ||
<br /> | <br /> | ||
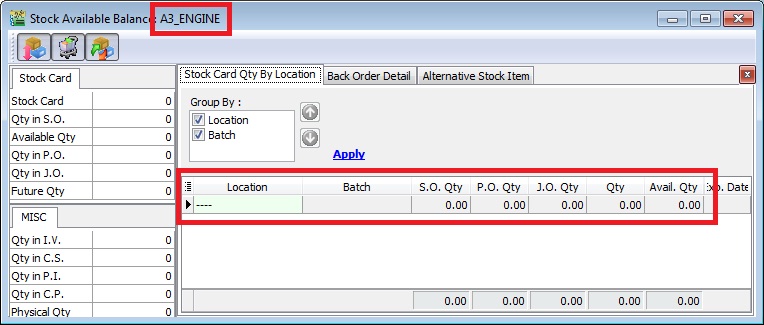
4. Below is component “ENGINE” stock available balance, | |||
::[[File:PD-Job Order-AvailableBal-03.jpg | 440PX]] | |||
'''Result for component “ENGINE” item:''' | |||
: | SO Qty = 0.00 | ||
PO Qty = 0.00 | |||
JO Qty = 0.00 | |||
Qty (On Hand) = 0.00 | |||
Available Qty = 0.00 | |||
'''NOTE: Qty (On Hand) results above are trying to show the stock movement purpose only.''' | |||
<br /> | <br /> | ||
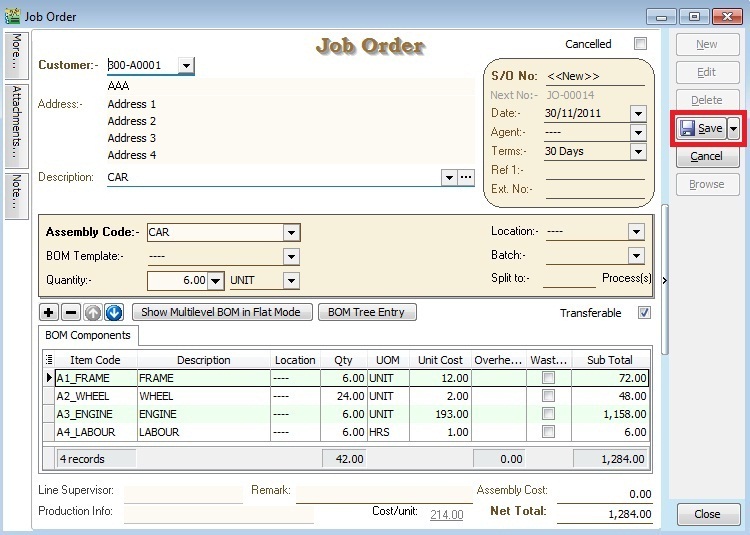
==Save Job Order Document== | |||
1. CLICK on SAVE button. | |||
::[[File:PD-Job Order-Save JO.jpg | 440PX]] | |||
| | |||
<br /> | <br /> | ||
== | ==AFTER SAVE - JO Check on the Available Stock Balance== | ||
1. HIGHLIGHT on the component items and PRESS on F11 keyboard button (Available Stock Balance). | 1. HIGHLIGHT on the component items and PRESS on F11 keyboard button (Available Stock Balance). | ||
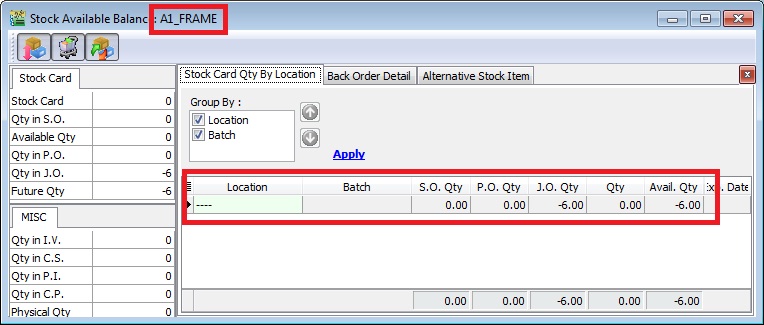
2. Below is component “FRAME” stock available balance, | 2. Below is component “FRAME” stock available balance, | ||
::[[File:PD-Job Order-AvailableBal- | ::[[File:PD-Job Order-AvailableBal-01s.jpg | 440PX]] | ||
'''Result for component “FRAME” item:''' | '''Result for component “FRAME” item:''' | ||
| Line 145: | Line 125: | ||
Qty (On Hand) = 0.00 | Qty (On Hand) = 0.00 | ||
Available Qty = -6.00 | Available Qty = -6.00 | ||
'''NOTE: Qty (On Hand) results above are trying to show the stock movement purpose only.''' | |||
<br /> | |||
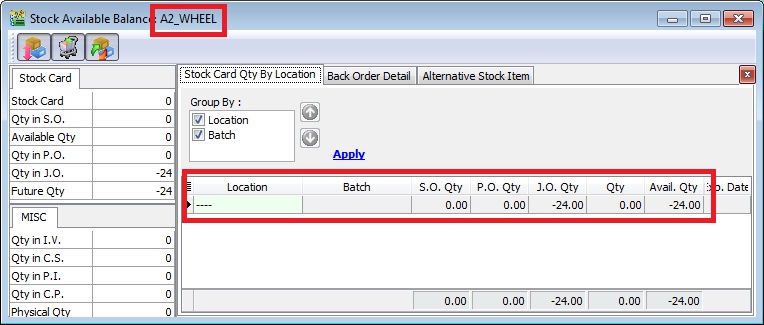
3. Below is component “WHEEL” stock available balance, | 3. Below is component “WHEEL” stock available balance, | ||
::[[File:PD-Job Order-AvailableBal- | ::[[File:PD-Job Order-AvailableBal-02s.jpg | 440PX]] | ||
'''Result for component “WHEEL” item:''' | '''Result for component “WHEEL” item:''' | ||
SO Qty = | SO Qty = 0.00 | ||
PO Qty = | PO Qty = 0.00 | ||
JO Qty = -24.00 | JO Qty = -24.00 | ||
Qty (On Hand) = 0.00 | Qty (On Hand) = 0.00 | ||
Available Qty = - | Available Qty = -24.00 | ||
'''NOTE: Qty (On Hand) results above are trying to show the stock movement purpose only.''' | |||
<br /> | |||
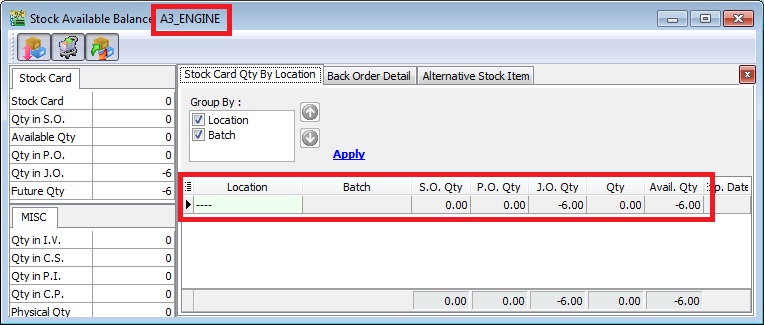
4. Below is component “ENGINE” stock available balance, | 4. Below is component “ENGINE” stock available balance, | ||
::[[File:PD-Job Order-AvailableBal- | ::[[File:PD-Job Order-AvailableBal-03s.jpg | 440PX]] | ||
'''Result for component “ENGINE” item:''' | '''Result for component “ENGINE” item:''' | ||
| Line 169: | Line 153: | ||
Qty (On Hand) = 0.00 | Qty (On Hand) = 0.00 | ||
Available Qty = -6.00 | Available Qty = -6.00 | ||
'''NOTE: Qty (On Hand) results above are trying to show the stock movement purpose only.''' | |||
<br /> | <br /> | ||
== | ==Split to X Process== | ||
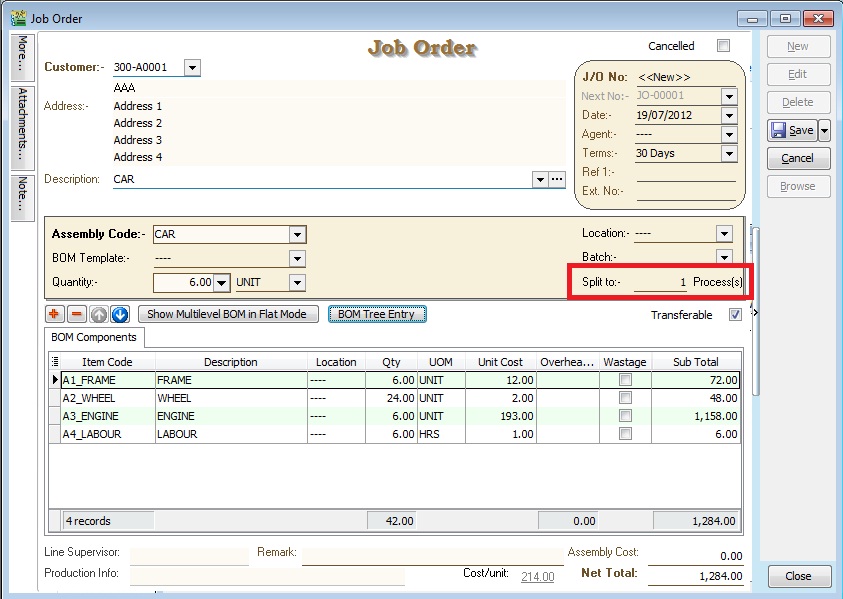
1. With this field, user able to assign number of processes/machines in one Job Order/Stock Item Assembly to produce same End Products using same range of BOM components. | 1. With this field, user able to assign number of processes/machines in one Job Order/Stock Item Assembly to produce same End Products using same range of BOM components. | ||
| Line 206: | Line 184: | ||
'''NOTE: Preview and select the standard report name "Job Order 2 with Multipler - 30 Columns (without cost)".''' | '''NOTE: Preview and select the standard report name "Job Order 2 with Multipler - 30 Columns (without cost)".''' | ||
<br /> | |||
==Show Multilevel BOM in Flat Mode== | |||
1. This function ables to drill down to the flatten or deepest level of the BOM structure. For example, the CAR multilevel BOM structure. | |||
{| class="wikitable" | |||
|- | |||
! '''Level 0''' !! '''Level 1''' !! '''Level 2''' !! '''Level 3''' | |||
|- | |||
| Car || Frame || Front Frame || Orange | |||
|- | |||
| Car || Frame || Front Frame || Screw | |||
|- | |||
| Car || Frame || Back Frame || Red Light | |||
|- | |||
| Car || Frame || Back Frame || Screw | |||
|- | |||
| Car || Wheel || Rim || | |||
|- | |||
| Car || Wheel || Tyres || | |||
|- | |||
| Car || Engine || Engine Block || Filter | |||
|- | |||
| Car || Engine || Engine Block || Screw | |||
|- | |||
| Car || Engine || Piston || Tube | |||
|- | |||
| Car || Engine || Piston || Cover | |||
|- | |||
| Car || Labour || || | |||
|} | |||
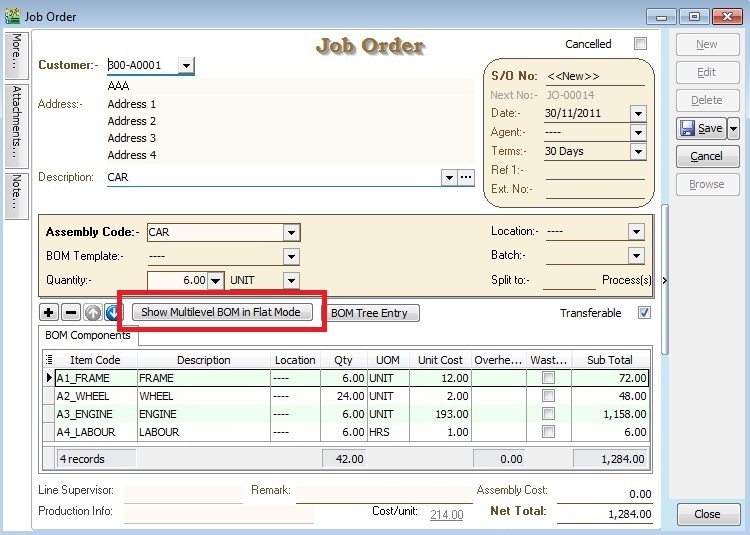
2. Before FLAT mode, the BOM components shown at LEVEL 1. | |||
::[[File:PD-Job Order-Show Multilevel BOM.jpg | 440PX]] | |||
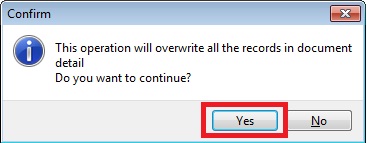
3. CLICK on Show Multilevel BOM in Flat Mode button. It will prompted a message. See below screenshot. | |||
::[[File:PD-Job Order-Show,Multilevel BOM-Message.jpg | 440PX]] | |||
* '''PRESS NO''' to remain the BOM components at '''LEVEL 1'''. | |||
* '''PRESS YES''' to flatten the multilevel BOM till '''LEVEL 3'''. | |||
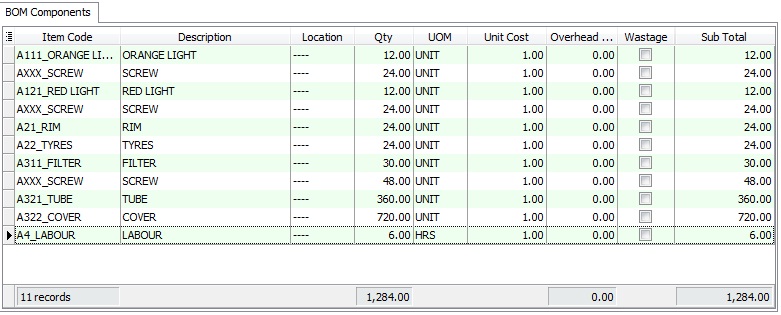
4. After FLAT mode, the BOM components will be shown at LEVEL 3. | |||
::[[File: PD-Job Order-Flat mode.jpg | 440PX]] | |||
<br /> | |||
==BOM Tree Entry== | |||
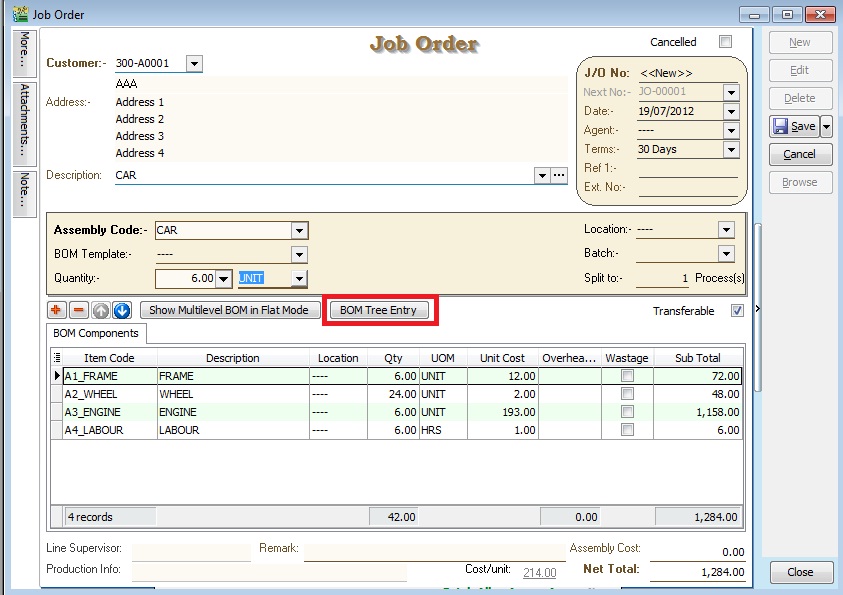
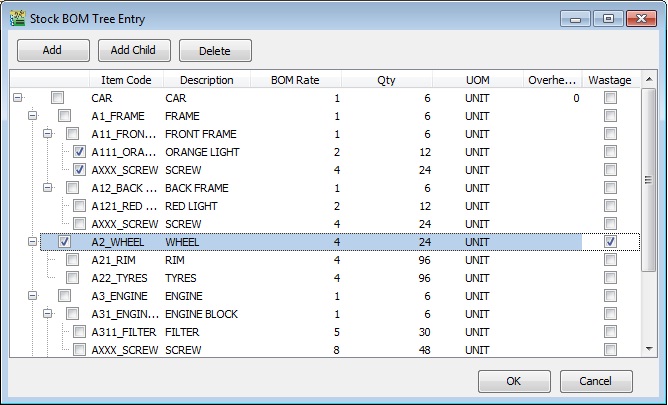
1. Some manufacturing company need to modify and overwrite the standard BOM structure during the entry stage. This button is help to add/remove the components to overwrite the BOM structure. | |||
2. Click the "BOM Tree Entry" button. | |||
::[[File:PD-Job Order-BOM Tree Entry.jpg | 440PX]] | |||
<br /> | |||
3. You can drill down all the BOM structure. | |||
4. Tick the components in the tree you wish to insert into the Job Order/Stock Assembly/Disassembly. | |||
5. Press OK to confirm. | |||
::[[File:PD-Job Order-BOM Tree Entry 2.jpg | 440PX]] | |||
<br /> | |||
{| class="wikitable" | |||
|- | |||
! '''Button''' !! '''Function''' | |||
|- | |||
| Add || To add new components at LEVEL 1 ONLY | |||
|- | |||
| Add Child || To add new child components start from LEVEL 2 onwards | |||
|- | |||
| Delete || To remove the components at all LEVEL 1, 2, 3, 4, ... | |||
|} | |||
<br /> | |||
Latest revision as of 04:35, 16 January 2016
Menu: Production | Job Order...
Introduction
Sales coordinator usually will input the Sales Order (SO) based on the customer PO received. The stock products will be updated into the system as ordered qty.
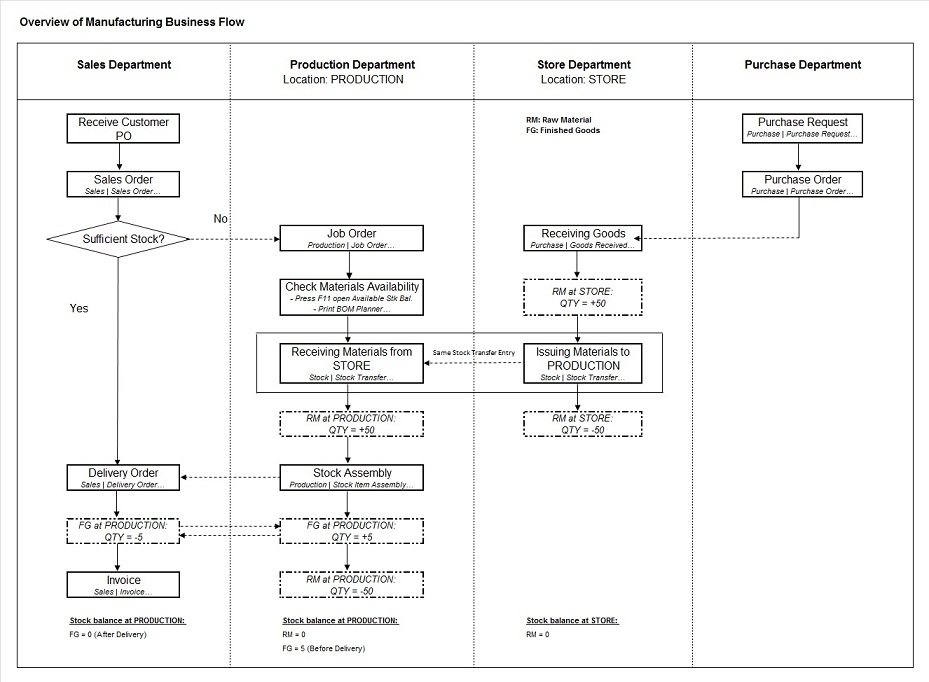
How much of the materials/components required to meet the products ordered by customer? This question raised by the Material Planning department. Therefore, the Job Order takes place as the order to be input after Sales Order. It will planned the materials/components required based on the qty ordered from Sales Order. When products produce out, basically you have to transfer the Job Order to Stock Assembly to commit on the stock on hand.
IMPORTANT: It is required the Job Order module. For more information about price, please refer to our sales personal.
See below the sample flow chart:
Create New Job Order
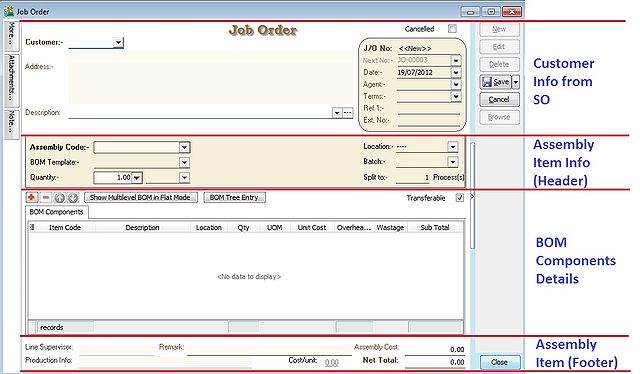
CLICK on NEW button and SELECT the Customer.
| Sections | Explanation |
|---|---|
| Customer Info from SO | Basically, the customer and others information copy from SO. |
| Assembly Item Info (Header & Footer) | Assembly item transferred from SO. It will determine the BOM Components required and the assembly unit cost. |
| BOM Components Details | Total components quantity requirement to meet the total output. |
JO Transfer From SO
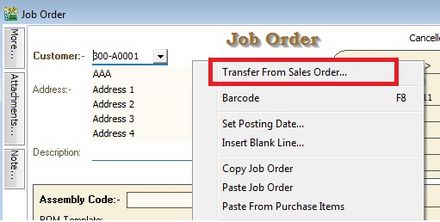
1. RIGHT CLICK on Job Order (Title).
2. CLICK on Transfer From Sales Order in the small menu.
Document Transfer (SO --> JO)
1. Pick the item from SO list.
2. INPUT X/F qty wish to transfer into JO.
3. CLICK OK button to proceed next.
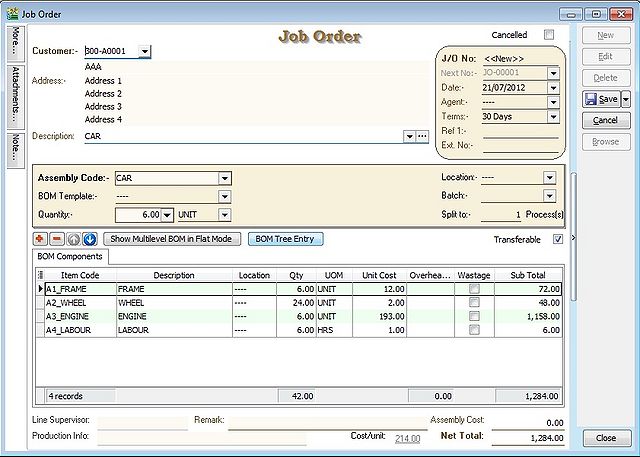
4. After transferred from SO, you will see the BOM components qty updated in Job Order.
BEFORE SAVE - JO Check on the Available Stock Balance
1. HIGHLIGHT on the component items and PRESS on F11 keyboard button (Available Stock Balance).
2. Below is component “FRAME” stock available balance,
Result for component “FRAME” item:
SO Qty = 0.00
PO Qty = 0.00
JO Qty = 0.00
Qty (On Hand) = 0.00
Available Qty = 0.00
NOTE: Qty (On Hand) results above are trying to show the stock movement purpose only.
3. Below is component “WHEEL” stock available balance,
Result for component “WHEEL” item:
SO Qty = 0.00
PO Qty = 0.00
JO Qty = 0.00
Qty (On Hand) = 0.00
Available Qty = 0.00
NOTE: Qty (On Hand) results above are trying to show the stock movement purpose only.
4. Below is component “ENGINE” stock available balance,
Result for component “ENGINE” item:
SO Qty = 0.00
PO Qty = 0.00
JO Qty = 0.00
Qty (On Hand) = 0.00
Available Qty = 0.00
NOTE: Qty (On Hand) results above are trying to show the stock movement purpose only.
Save Job Order Document
1. CLICK on SAVE button.
AFTER SAVE - JO Check on the Available Stock Balance
1. HIGHLIGHT on the component items and PRESS on F11 keyboard button (Available Stock Balance).
2. Below is component “FRAME” stock available balance,
Result for component “FRAME” item:
SO Qty = 0.00
PO Qty = 0.00
JO Qty = -6.00
Qty (On Hand) = 0.00
Available Qty = -6.00
NOTE: Qty (On Hand) results above are trying to show the stock movement purpose only.
3. Below is component “WHEEL” stock available balance,
Result for component “WHEEL” item:
SO Qty = 0.00
PO Qty = 0.00
JO Qty = -24.00
Qty (On Hand) = 0.00
Available Qty = -24.00
NOTE: Qty (On Hand) results above are trying to show the stock movement purpose only.
4. Below is component “ENGINE” stock available balance,
Result for component “ENGINE” item:
SO Qty = 0.00
PO Qty = 0.00
JO Qty = -6.00
Qty (On Hand) = 0.00
Available Qty = -6.00
NOTE: Qty (On Hand) results above are trying to show the stock movement purpose only.
Split to X Process
1. With this field, user able to assign number of processes/machines in one Job Order/Stock Item Assembly to produce same End Products using same range of BOM components.
2. For example, To make a cup of MILO KAO KAO, it needs - MILO Powder x 5 spoons - Sugar x 0.5 spoon - Water x 100ml
In order to make 100 cups of milo from one Job Order created, we need 10 persons to make it more efficient. Therefore, we have to input "Split to 10 process(s)", it means 10 persons processing. Job Order will be break the BOM components into 10 processes like below:
| No of process(s) | 1 | 2 | 3 | 4 | 5 | 6 | 7 | 8 | 9 | 10 | TOTAL |
|---|---|---|---|---|---|---|---|---|---|---|---|
| MILO Powder | 50 | 50 | 50 | 50 | 50 | 50 | 50 | 50 | 50 | 50 | 500 spoons |
| Sugar | 5 | 5 | 5 | 5 | 5 | 5 | 5 | 5 | 5 | 5 | 50 spoons |
| Water | 1000 | 1000 | 1000 | 1000 | 1000 | 1000 | 1000 | 1000 | 1000 | 1000 | 10000 ml |
NOTE: Preview and select the standard report name "Job Order 2 with Multipler - 30 Columns (without cost)".
Show Multilevel BOM in Flat Mode
1. This function ables to drill down to the flatten or deepest level of the BOM structure. For example, the CAR multilevel BOM structure.
| Level 0 | Level 1 | Level 2 | Level 3 |
|---|---|---|---|
| Car | Frame | Front Frame | Orange |
| Car | Frame | Front Frame | Screw |
| Car | Frame | Back Frame | Red Light |
| Car | Frame | Back Frame | Screw |
| Car | Wheel | Rim | |
| Car | Wheel | Tyres | |
| Car | Engine | Engine Block | Filter |
| Car | Engine | Engine Block | Screw |
| Car | Engine | Piston | Tube |
| Car | Engine | Piston | Cover |
| Car | Labour |
2. Before FLAT mode, the BOM components shown at LEVEL 1.
3. CLICK on Show Multilevel BOM in Flat Mode button. It will prompted a message. See below screenshot.
- PRESS NO to remain the BOM components at LEVEL 1.
- PRESS YES to flatten the multilevel BOM till LEVEL 3.
4. After FLAT mode, the BOM components will be shown at LEVEL 3.
BOM Tree Entry
1. Some manufacturing company need to modify and overwrite the standard BOM structure during the entry stage. This button is help to add/remove the components to overwrite the BOM structure.
2. Click the "BOM Tree Entry" button.
3. You can drill down all the BOM structure.
4. Tick the components in the tree you wish to insert into the Job Order/Stock Assembly/Disassembly.
5. Press OK to confirm.
| Button | Function |
|---|---|
| Add | To add new components at LEVEL 1 ONLY |
| Add Child | To add new child components start from LEVEL 2 onwards |
| Delete | To remove the components at all LEVEL 1, 2, 3, 4, ... |
