(→Steps) |
(→Steps) |
||
| (5 intermediate revisions by the same user not shown) | |||
| Line 1: | Line 1: | ||
==Introduction== | ==Introduction== | ||
By default in Fast Report if you set 2 or more columns in detail it will shown the data Left Right.< | By default in Fast Report if you set 2 or more columns in detail it will shown the data Left Right. <br /> | ||
In order to shown DownThenCross you need do some script as below. | In order to shown DownThenCross you need do some script as below. | ||
| Line 10: | Line 10: | ||
Below is example using GL Official Receipt | Below is example using GL Official Receipt | ||
[[File:FR-DownThenCross-01.jpg|800px|center]] | [[File:FR-DownThenCross-01.jpg|800px|center]] | ||
:01. Select '''DetailData''' Band | |||
:02. Click '''Properties''' Tab | |||
:03. Set the following setting | |||
{| class="wikitable" style="margin: 1em auto 1em auto;" | |||
|- | |||
! Setting !! Description | |||
|- | |||
| Columns || Number of column(s) to shown | |||
|- | |||
| ColumnWidth || Width for each column | |||
|} | |||
[[File:FR-DownThenCross-02.jpg|800px|center]] | |||
:04. Click '''Events''' Tab | |||
:05. Double Click '''OnAfterPrint''' & enter below script | |||
<syntaxhighlight lang="delphi"> | |||
procedure DetailData3OnAfterPrint(Sender: TfrxComponent); | |||
begin | |||
DownThenAcross_After(Sender, 'FromDockey'); | |||
end; | |||
</syntaxhighlight> | |||
:06. Repeat Step 5 again for '''OnBeforePrint''' & enter below script | |||
<syntaxhighlight lang="delphi"> | |||
procedure DetailData3OnBeforePrint(Sender: TfrxComponent); | |||
begin | |||
DownThenAcross_Before(Sender, 'FromDockey'); | |||
end; | |||
</syntaxhighlight> | |||
==See also== | |||
* [[Report Designer]] | |||
* Others [[Customisation]] | |||
Latest revision as of 03:13, 5 October 2018
Introduction
By default in Fast Report if you set 2 or more columns in detail it will shown the data Left Right.
In order to shown DownThenCross you need do some script as below.
Requirement
- Fast Report
- SQL Accounting Version 722 & above
Steps
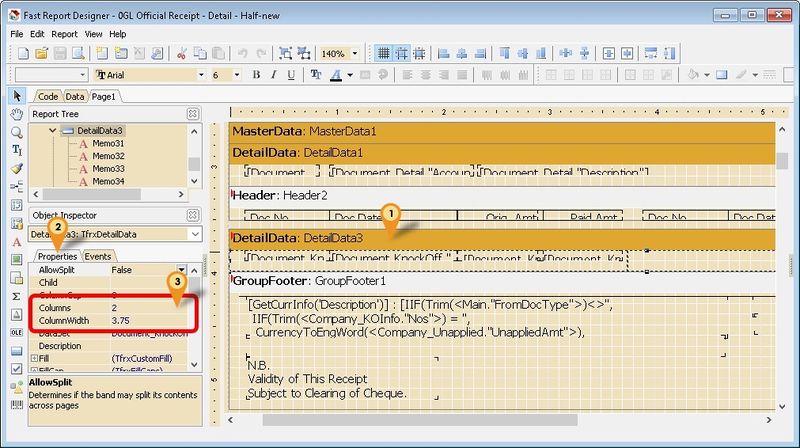
Below is example using GL Official Receipt
- 01. Select DetailData Band
- 02. Click Properties Tab
- 03. Set the following setting
| Setting | Description |
|---|---|
| Columns | Number of column(s) to shown |
| ColumnWidth | Width for each column |
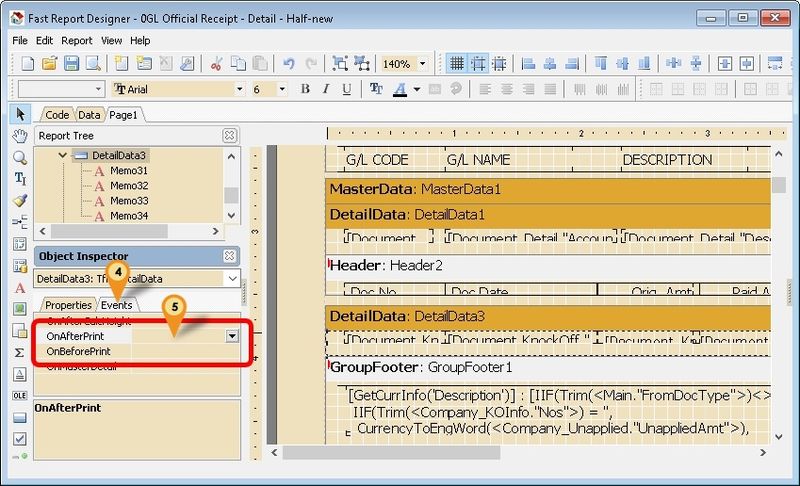
- 04. Click Events Tab
- 05. Double Click OnAfterPrint & enter below script
procedure DetailData3OnAfterPrint(Sender: TfrxComponent);
begin
  DownThenAcross_After(Sender, 'FromDockey');
end;
- 06. Repeat Step 5 again for OnBeforePrint & enter below script
procedure DetailData3OnBeforePrint(Sender: TfrxComponent);
begin
 DownThenAcross_Before(Sender, 'FromDockey');
end;
See also
- Report Designer
- Others Customisation

