| (4 intermediate revisions by the same user not shown) | |||
| Line 46: | Line 46: | ||
| Commands || List of Available Buttons on the Selected Category | | Commands || List of Available Buttons on the Selected Category | ||
|} | |} | ||
[[File:Tools.BarNavigator5.jpg | center]] | |||
:04. Select ''Categories'' (eg Sales) | |||
:05. Select ''Commands'' (eg Invoice...) | |||
:06. Drag from Step 5 to here | |||
:07. Click ''Close'' | |||
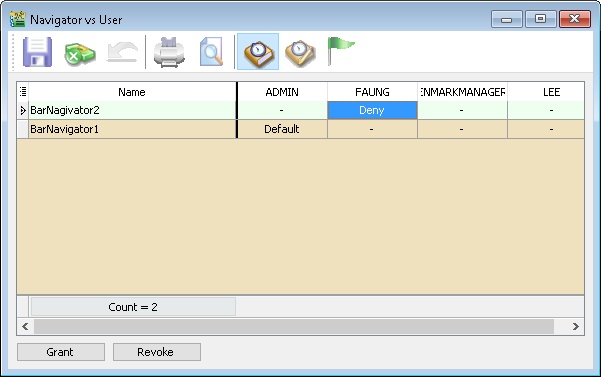
:08. Click ''Save'' | |||
:09. Click ''Browse'' | |||
:10. Click ''More | Navigator vs User'' | |||
[[File:Tools.BarNavigator6.jpg | center]] | |||
{| class="wikitable" style="margin: 1em auto 1em auto;" | |||
|- | |||
! Options !! Properties | |||
|- | |||
| - || No setting is Set | |||
|- | |||
| Default || Set the Setting | |||
|- | |||
| Deny || Not allow to use. (Not use in this Function) | |||
|} | |||
:11. Set the User to use the Toolbar. | |||
:12. Click Save (Blue Disc Icon button) | |||
Latest revision as of 06:07, 15 April 2016
Tools | Maintain User... | More | Bar Navigator
Introduction
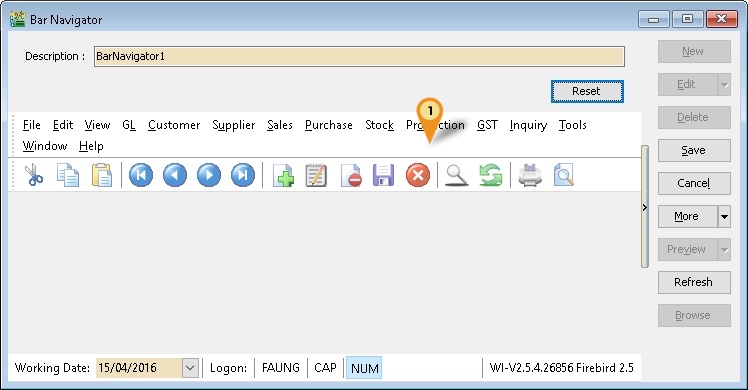
This function is to allow user to customer the buttons at the Main Application by user.
| Field Name | Properties |
|---|---|
| Description |
|
| Reset Button | To restore to Default Layout |
- 01. Right Click here
- 02. Select Customize...
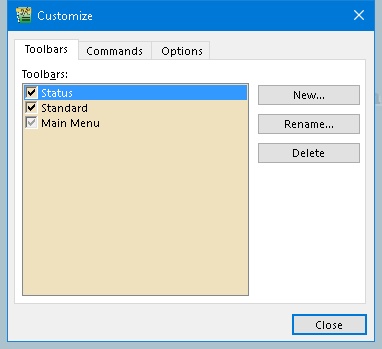
| Field Name | Properties |
|---|---|
| Toolbars | Show list of available Toolbars. |
| New... button | Create New Toolbar |
| Rename...button | Rename the highlighted Toolbar |
| Delete | Delete highlighted Toolbar |
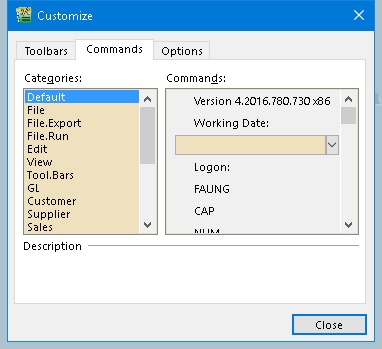
- 03. Select Commands tab
| Field Name | Properties |
|---|---|
| Categories | List of Available Buttons Category |
| Commands | List of Available Buttons on the Selected Category |
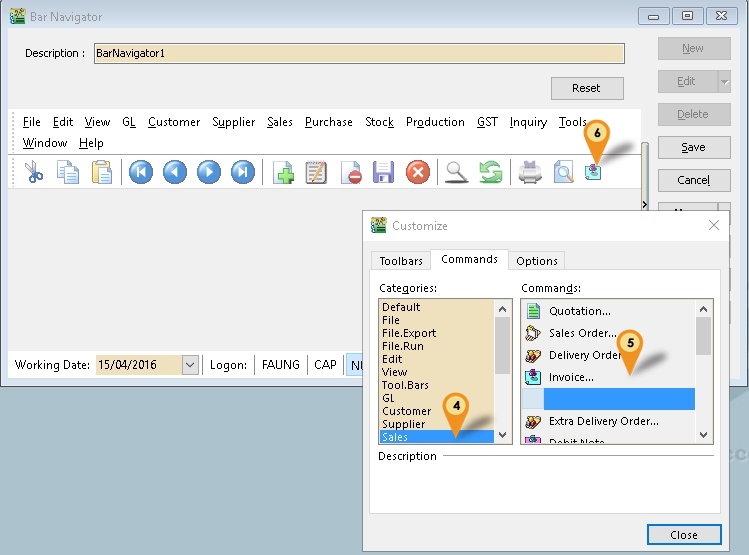
- 04. Select Categories (eg Sales)
- 05. Select Commands (eg Invoice...)
- 06. Drag from Step 5 to here
- 07. Click Close
- 08. Click Save
- 09. Click Browse
- 10. Click More | Navigator vs User
| Options | Properties |
|---|---|
| - | No setting is Set |
| Default | Set the Setting |
| Deny | Not allow to use. (Not use in this Function) |
- 11. Set the User to use the Toolbar.
- 12. Click Save (Blue Disc Icon button)
